
Trusted Platform Module (TPM) 2.0 and Secure Boot for Call of Duty
Information about enabling TPM 2.0 and Secure Boot on your PC to play Call of Duty
TOP HELPFUL TIPS!
- BIOS firmware updates: Guidance to update your motherboard if you enabled TPM 2.0 but keep getting prompted in Call of Duty.
- Run the latest Call of Duty Secure Attestation Wizard: Provides a quick way to verify that your PC meets our security requirements.
The Trusted Platform Module 2.0 (TPM 2.0) is a technology that provides hardware-based security features on PCs operating Windows.
Secure Boot is another system-level feature that helps protect against low-level cheats by ensuring only trusted software loads during your PC’s startup. Enabling Secure Boot alongside TPM 2.0 provides an added layer of protection and is recommended for the best, most secure Call of Duty® experience.
PC players without TPM 2.0 enabled may receive an in-game notification indicating their system does not meet the new security requirements when launching applicable Call of Duty games.
Both security features were added to Call of Duty with the launch of Season 05, in August 2025.
Both TPM 2.0 and Secure Boot are required to play Call of Duty: Black Ops 7 and Call of Duty: Warzone; however, neither are required to play other currently available Call of Duty titles. Keeping these settings enabled ensures a fair and fun experience for all players.
Note: PCs using Windows 11 likely already have both security features enabled, as they are required for the operating system. Windows 10 systems will require updates if TPM is disabled or if a legacy TPM version (1.0 - 1.2) is enabled. While TPM 2.0 requires Windows 10 version 20H2 or later, Call of Duty requires Windows 10 version 22H2 or later.
Important! This article offers general guidance, and some steps may differ depending on your PC.
If you’re not familiar with accessing and updating your UEFI/BIOS settings, you should reach out to your hardware manufacturer’s customer support or a professional for assistance. Changing UEFI/BIOS settings improperly can cause system issues, including boot failures.
We also strongly recommend reviewing your PC and motherboard manufacturer’s manuals and support resources before making any changes to your UEFI/BIOS settings. Activision is not responsible for changes made to your UEFI/BIOS settings.
TPM 2.0 and Secure Boot
1. Why should TPM 2.0 and Secure Boot be enabled?
TPM 2.0 and Secure Boot help protect your system against cheats and unauthorized access by verifying your PC’s integrity from startup to gameplay. Together, they provide a stronger foundation for in-game security and work alongside RICOCHET™ Anti-Cheat to keep matches fair and fun.
TPM 2.0 is available for Windows 10 but is required for Windows 11, so enabling both features ensures your system is ready for future updates and secure Call of Duty play.
Note: TPM 2.0 and Secure Boot are required to play Call of Duty: Black Ops 7 and Call of Duty: Warzone.
2. What are the requirements for TPM 2.0 and Secure Boot in Call of Duty?
Required Operating System:
- Windows 10 (version 22H2 or later)
- Windows 11 (any version)
TPM 2.0 Requirements:
- TPM Version: Must be 2.0
- CPU Support:
- Intel: 8th Gen or newer (with Intel PTT) | Supported Intel CPUs
- AMD: Ryzen 2000 series or newer (with AMD CPU fTPM) | Supported AMD CPUs
- BIOS Setting:
- Referenced as Intel PTT (Intel CPUs), AMD CPU fTPM (AMD CPUs), or systems with a discrete TPM chip (dTPM) in the UEFI/BIOS
Secure Boot Requirements:
- BIOS Boot Mode: Must be set to UEFI, not Legacy
- Disk Partition Style: Must be GPT, not MBR
- BIOS Setting: Enable Secure Boot
3. What will happen if I don’t enable TPM 2.0 and Secure Boot?
Players who choose not to enable TPM 2.0 and Secure Boot will not benefit from their security protections.
Reminder: These features are required for anti-cheat enforcement in Call of Duty: Black Ops 7 and Call of Duty: Warzone.
4. What should I do if I can’t enable TPM 2.0 and Secure Boot?
- Ensure your PC supports these settings.
- Consult your PC/motherboard manual or manufacturer’s website.
- If issues persist, reach out to your hardware vendor.
Call of Duty Secure Attestation Wizard
The Call of Duty Secure Attestation Wizard provides a quick way to verify that your PC meets our security requirements. The wizard will help you confirm whether everything is configured correctly and offer guidance if anything needs adjustment.
Download the Call of Duty Secure Attestation Wizard (version 1.1.0, updated June 26, 2026)
1. How do I use the Secure Attestation Wizard?
The Secure Attestation Wizard is packaged in a .zip file. Once downloaded, extract the attestation wizard from the .zip file, then double-click CODSecureAttestationWizard.exe. Follow the steps in the attestation wizard to accept the Terms and run the scan. Select Settings at the bottom of the wizard to set your preferred language for displaying the Call of Duty Attestation Wizard.
Results:- System compliant: Your PC meets all security requirements for Call of Duty: Black Ops 7 and Call of Duty: Warzone, and you can delete the Secure Attestation from your hard drive.
- System not compliant: The attestation wizard will show which PC configurations must be updated to meet security requirements for Call of Duty: Black Ops 7 and Call of Duty: Warzone.
2. Why should I run the Secure Attestation Wizard?
The Secure Attestation Wizard scans the BIOS information on your PC to determine if it meets the security requirements to play applicable Call of Duty games.
If security requirements are met, you will be able to play, and no further action is required.
If the Secure Attestation Wizard detects that your system is not compliant, you will be met with a notification and instructions for next steps to meet compliance.
3. What should I do if I receive a notification stating that my system isn’t compliant?
TPM 2.0: Not Enabled
The scan detected that your system does not meet TPM 2.0 requirements and will need to be enabled. Learn how to enable TPM 2.0 on your PC.
Secure Boot: Not Enabled
The scan detected that your system does not meet Secure Boot requirements and will need to be enabled. Learn how to enable Secure Boot on your PC.
Boot Partition not set to GPT
The scan detected that your system does not meet Secure Boot requirements and additional configuration of your GPT partition style is required. Learn more about GPT partitions.
BIOS Boot mode not set to UEFI
The scan detected that your system does not meet Secure Boot requirements and additional configuration of your UEFI Boot mode is required. Learn more about BIOS Boot mode.
BIOS Firmware Update Required
The scan detected that your BIOS Firmware meets the minimum security requirements; however, a BIOS Firmware update is recommended and may be required in the future. Learn more about BIOS Firmware Updates.
Authorization Key Failed
The scan detected that your User Account Control (UAC) does not meet the authorization requirements to perform the complete system scan. Selecting Generate Key will trigger a UAC prompt for an application named enrollaik.exe. Select Yes to allow validation of your TPM 2.0 settings. Learn more about the UAC Prompt and enrollaik.exe.
TCG Event Log Failed
The scan detected that your PC’s version of Windows is not up to date, resulting in a Trusted Computing Group (TCG) Event Log failure. You will need to restart your computer and apply the latest Windows update. Learn more about TCG Event Log failures.
TPM 2.0 Guidance
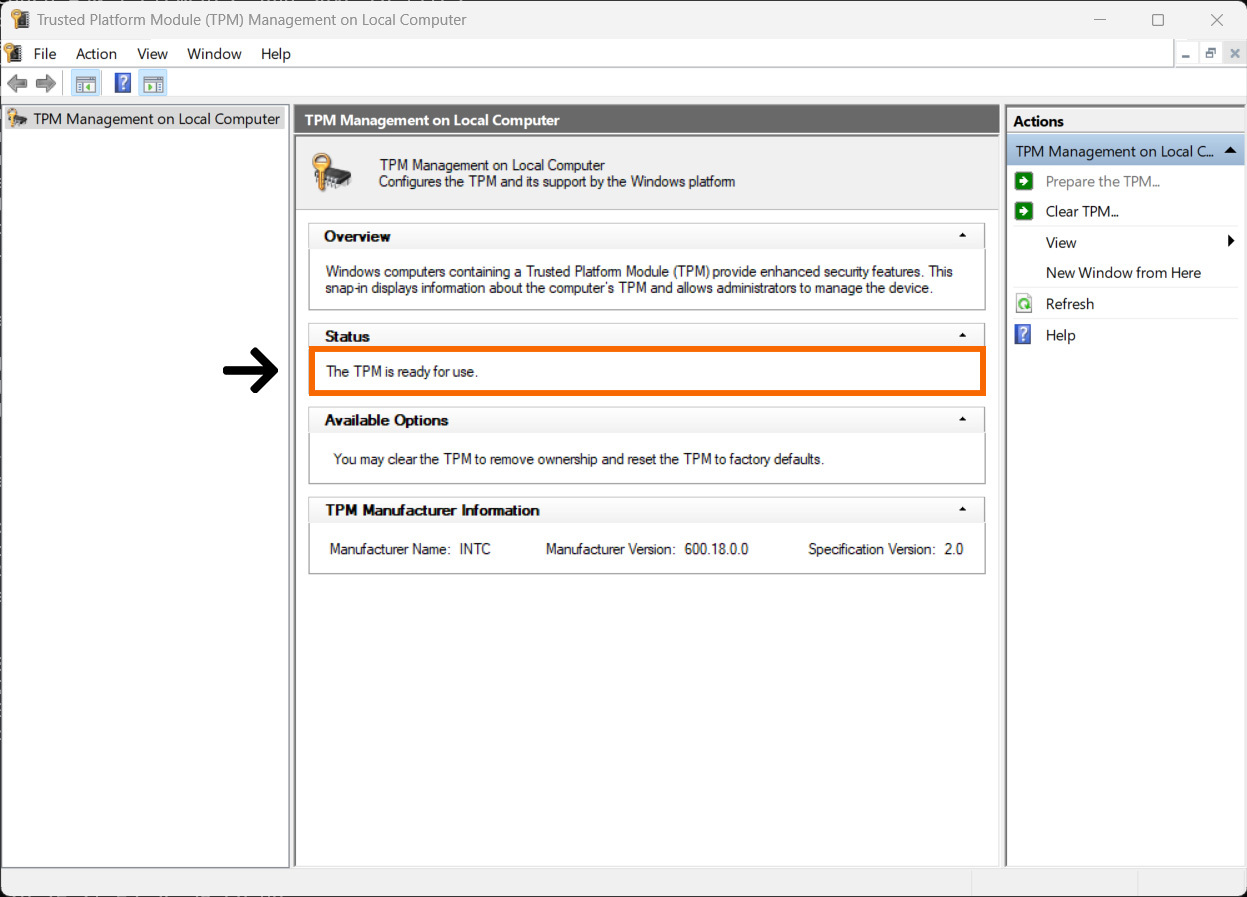
1. How do I check if TPM 2.0 is enabled on my PC?
- Press Windows key + R to open the Run dialog box.
- Type tpm.msc and press Enter.
- If TPM 2.0 is enabled, you’ll see “The TPM is ready for use” under the Status section.
- If you see “Compatible TPM cannot be found”, TPM may be disabled in your BIOS, or your system may not support it.
Note: TPM 2.0 and Secure Boot are required to play Call of Duty: Black Ops 7 and Call of Duty: Warzone.
Figure 1
tpm.msc details your Trusted Platform Module Status, in this example TPM 2.0 is active.
2. How do I enable TPM 2.0 on my PC?
Important: Your BIOS settings and interface may vary depending on your hardware manufacturer. Changing UEFI/BIOS settings improperly can cause system issues. Always follow official instructions from your motherboard manufacturer carefully. Activision is not responsible for changes made to your UEFI/BIOS settings.
In most cases, TPM 2.0 will need to be enabled in your PC’s UEFI/BIOS settings. The exact steps will vary depending on your system’s motherboard and firmware interface.
If you’re unfamiliar with your PC’s UEFI/BIOS or unsure how to make changes, we strongly recommend contacting a professional and/or your PC or motherboard manufacturer for step-by-step guidance.
Helpful links to PC and Motherboard Manufacturer Websites:
The exact BIOS menu structure varies by brand and chipset. Players should follow the exact instructions provided by their motherboard manufacturer.
Below are steps you may encounter in this process, but this does not serve as instructions. Always consult the official documentation from your PC or Motherboard manufacturer.

Helpful tip: The following steps will require you to restart your computer. Scan this QR code to continue reading on a secondary device.
General Process for Enabling TPM 2.0
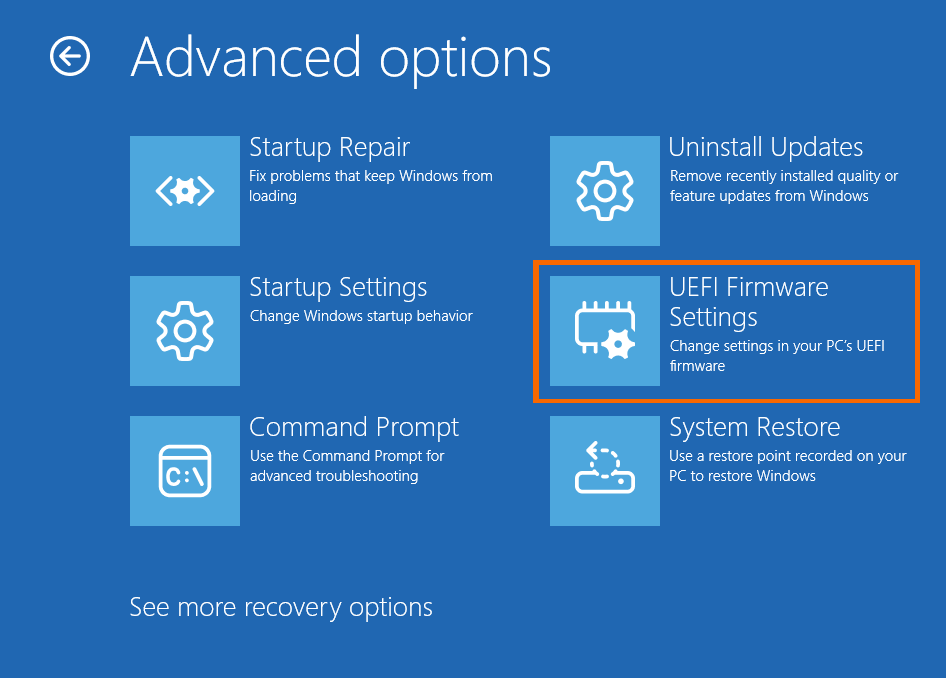
- Access your BIOS/UEFI settings (Advanced Restart → UEFI firmware settings).
Accessing your BIOS can be accomplished in many ways; however, one of the easiest is to restart your machine from Windows.- In Windows 11, go to Start → Settings → System → Recovery. Next to Advanced startup, select Restart Now.
- In Windows 10, go to Start → Settings → Update & Security → Recovery. Under Advanced startup, select Restart Now.
- Once your Windows 10/11 machine has restarted, go to Troubleshoot: see Advanced Options → UEFI Firmware Settings.
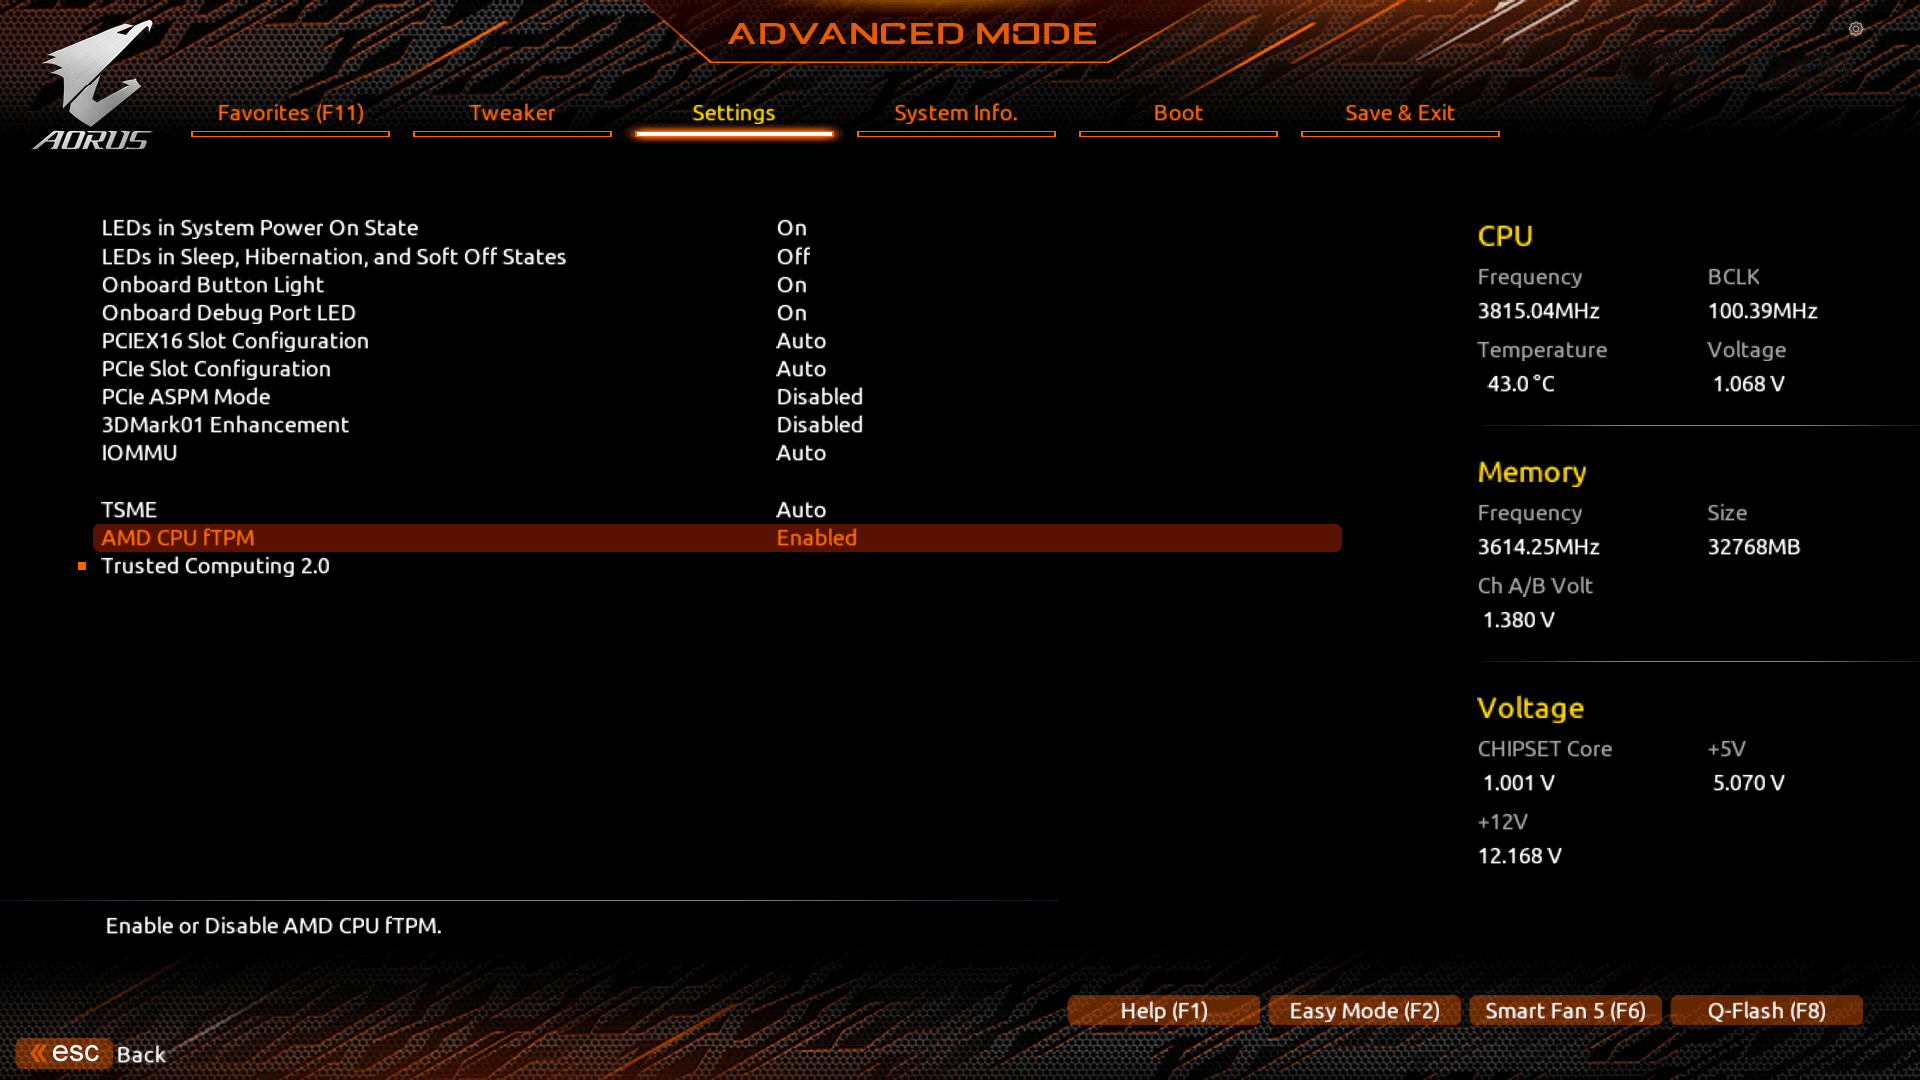
- Navigate to either Advanced, Security, or Trusted Computing (depending on motherboard manufacturer, consult official documentation). See Figure 3 below for example reference.
- Intel systems: Enable Intel PTT or Security Device Support.
- AMD systems: Enable AMD CPU fTPM.
- Exit and Save changes (generally F10) and reboot.
- Confirm in Windows with Windows Key + R → tpm.msc to check TPM 2.0 is active.
Figure 2
Windows Advanced options
Please note: When launching the game for the first time, you will receive a Windows User Account Control (UAC) prompt for an application named enrollaik.exe. Learn more about the UAC prompt.
Figure 3
Please note: The example below is for reference only, showing TPM 2.0 referred to as "AMD CPU fTPM" and enabled on the Settings tab in Advanced mode.
Your BIOS settings and interface may vary depending on your hardware manufacturer. Consult your motherboard manufacturer’s manuals and support resources for more detailed information.
Secure Boot Guidance
1. How do I check if Secure Boot is enabled on my PC?
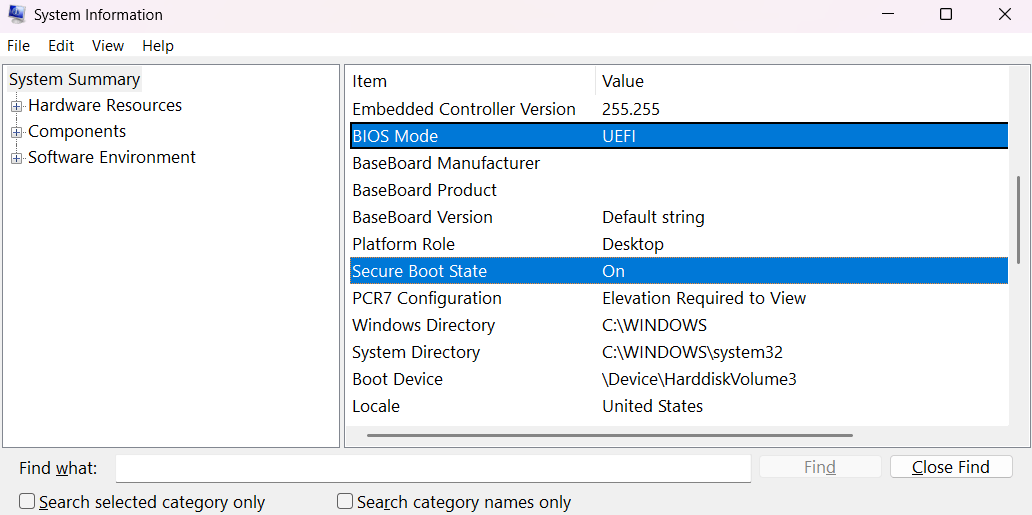
- Press Windows Key + R to open the Run dialog box.
- Type msinfo32 and hit Enter.
- In the System Information window (you can use the search bar to find each setting):
- BIOS Mode → should say UEFI
- Secure Boot State → should say On
What the System Information Means:
Secure Boot State: Off
Your system supports Secure Boot, but it’s currently disabled. Enable it in your BIOS.
Secure Boot State: Unsupported
Your system may not support Secure Boot. Check your motherboard documentation.
BIOS Mode: UEFI
Your PC supports Secure Boot, and the machine can be configured to turn it on.
BIOS Mode: Legacy
You’ll need to change Boot Mode to UEFI; however, you may be required to convert Disk Partition Style from MBR to GPT to enable UEFI and Secure Boot.
Figure 4
System Information shows the status of the BIOS Boot Mode and Secure Boot status. In this example, UEFI is set, as required, and Secure Boot is on.
2. Confirm the Disk Partition Style is set to GPT; Converting if MBR
Checking Disk Partition Style:
MBR (Master Boot Record) is an older standard for Disk Partition Style, with GPT (GUID Partition Table) being more commonplace today. However, if you are unsure if your drives are partitioned as GPT – required to set your BIOS Mode to UEFI to enable Secure Boot – you may check by:
Steps:
- Type Disk Management in Windows search bar and press Enter.
- Right-click on the drive with your Windows installation.
- Select Properties.
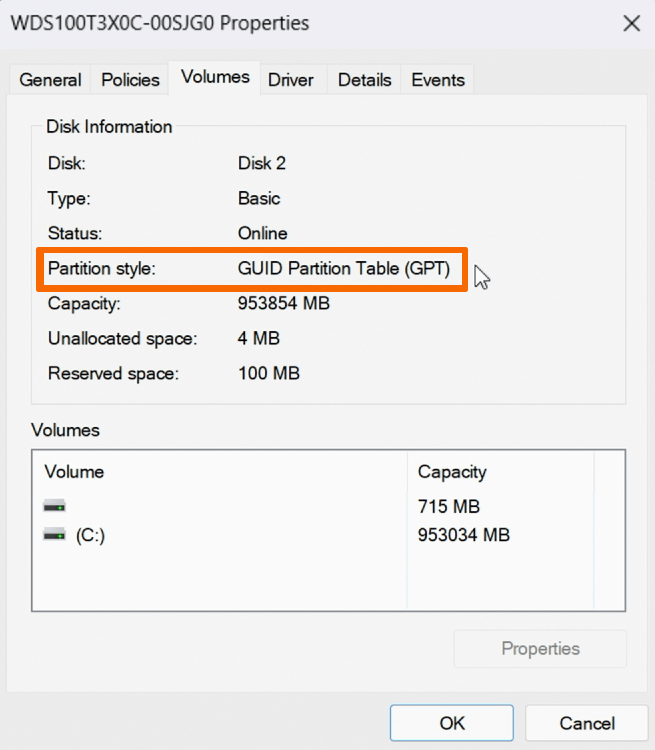
- Select the Volume tab in the new window.
- Confirm GPT is listed under Partition Style.
If GPT is listed, you can proceed.
Figure 5
Disk Management allows you to check the Partition Style of your disks.
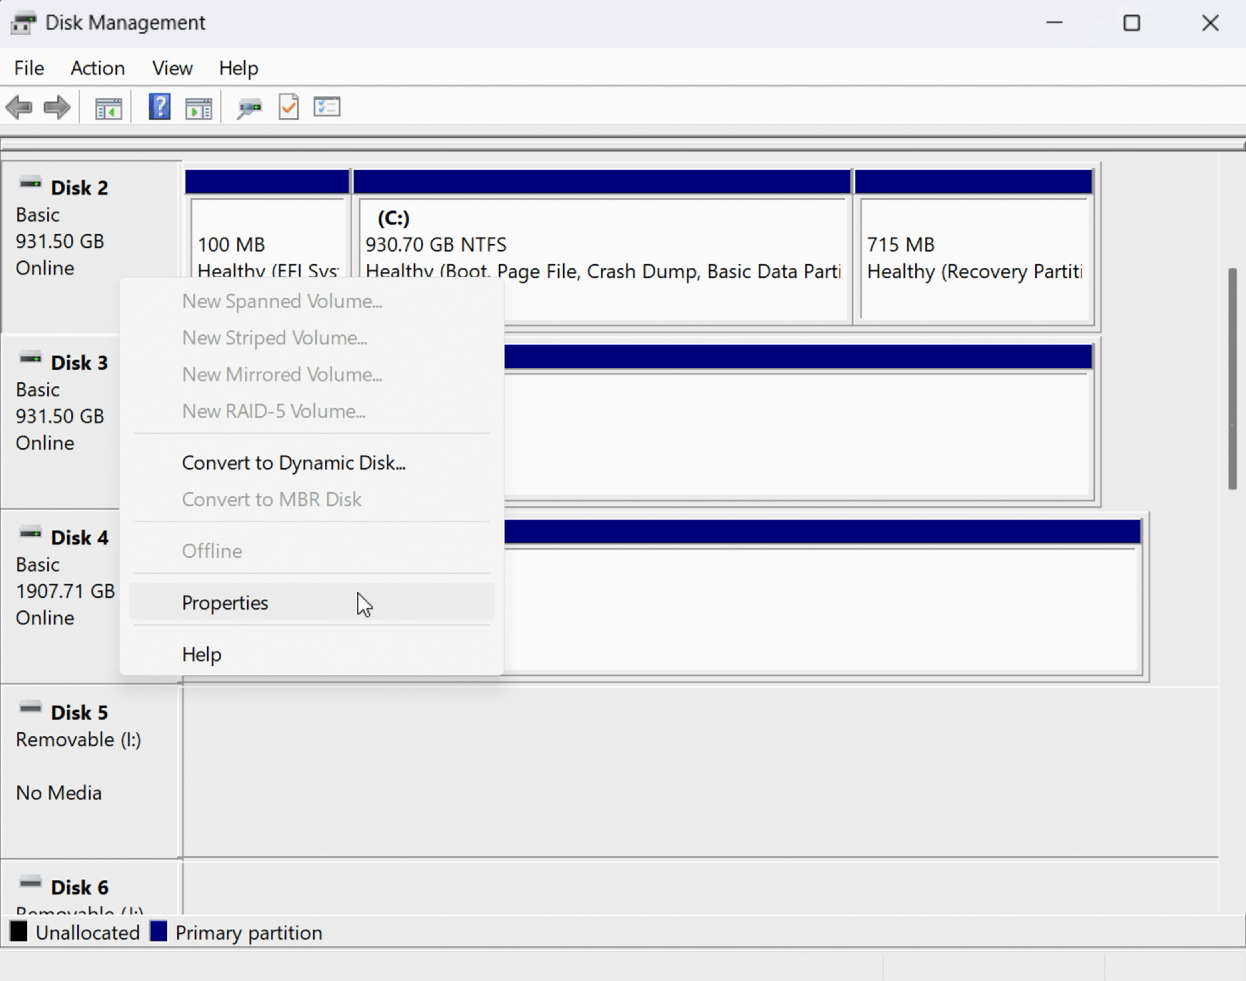
Figure 6
In the Volume tab of a disk’s Properties menu will list the Disk Partition Style. In this example, the disk is set as GPT (required).
If MBR is listed under Partition Style instead of GPT, you will need to convert your Disk Partition Style.
Requirements to Convert MBR to GPT:
- Windows 10 version 1703 or later
- MBR disk must have at most three partitions
- Operating System must be 64-bit
- Bitlocker or encryption must be turned off
- Dual boot not in use
- BIOS must support UEFI mode
- Secure Boot must be disabled before starting
Microsoft has a helpful guide to complete this operation online, we recommend following the steps in its official MBR2GPT guide.
Steps:
- Open Command Prompt as Administrator
- Press Windows Key, type cmd.
- Right-click on Command Prompt → choose Run as Administrator.
- Validate Disk
- Type mbr2gpt /validate /allowFullOS and press Enter.
- If this step succeeds, it’s safe to proceed.
- Convert Disk
- Type mbr2gpt /convert /allowFullOS and press Enter.
This will shrink the partition slightly and convert the disk to GPT.
- Reboot Into UEFI Mode
- Restart your PC.
- Enter BIOS (using Advanced Restart or by pressing Del, F2, or F10 during boot).
- Switch Boot Mode from Legacy to UEFI.
You may enable Secure Boot once system boots successfully into Windows again.
3. How to Enable Secure Boot
Important: Your BIOS settings and interface may vary depending on your hardware manufacturer. Changing UEFI/BIOS settings improperly can cause system issues. Always follow official instructions from your motherboard manufacturer carefully. Activision is not responsible for changes made to your UEFI/BIOS settings.
Requirements:
- Ensure BIOS Boot Mode is set to UEFI not Legacy (also referred to as CSM).
- Confirm your Disk Partition Style is using GPT not MBR.
- Enable Secure Boot in BIOS.
Helpful links to PC and Motherboard Manufacturer Websites:
Below are steps you may encounter in this process, but this does not serve as instructions. Always consult the official documentation from your PC or Motherboard manufacturer.
General Process for Enabling Secure Boot:
Helpful tip: The following steps will require you to restart your computer. Scan this QR code to continue reading on a secondary device.
- Access your BIOS/UEFI settings (Advanced Restart → UEFI firmware settings).
Accessing your BIOS can be accomplished in many ways; however, one of the easiest is to restart your machine from Windows.- In Windows 11, go to Start → Settings → System → Recovery. Next to Advanced startup, select Restart Now.
- In Windows 10, go to Start → Settings → Update & Security → Recovery. Under Advanced startup, select Restart Now.
- Once your Windows 10/11 machine has restarted, go to Troubleshoot: see Advanced Options → UEFI Fireware Settings.
- Navigate to the Boot tab within the BIOS.
- If you are having difficulty finding Secure Boot in your BIOS, many BIOS include a search feature (typically accessed by pressing F9); You should consult your PC or motherboard’s official documentation for detailed instructions.
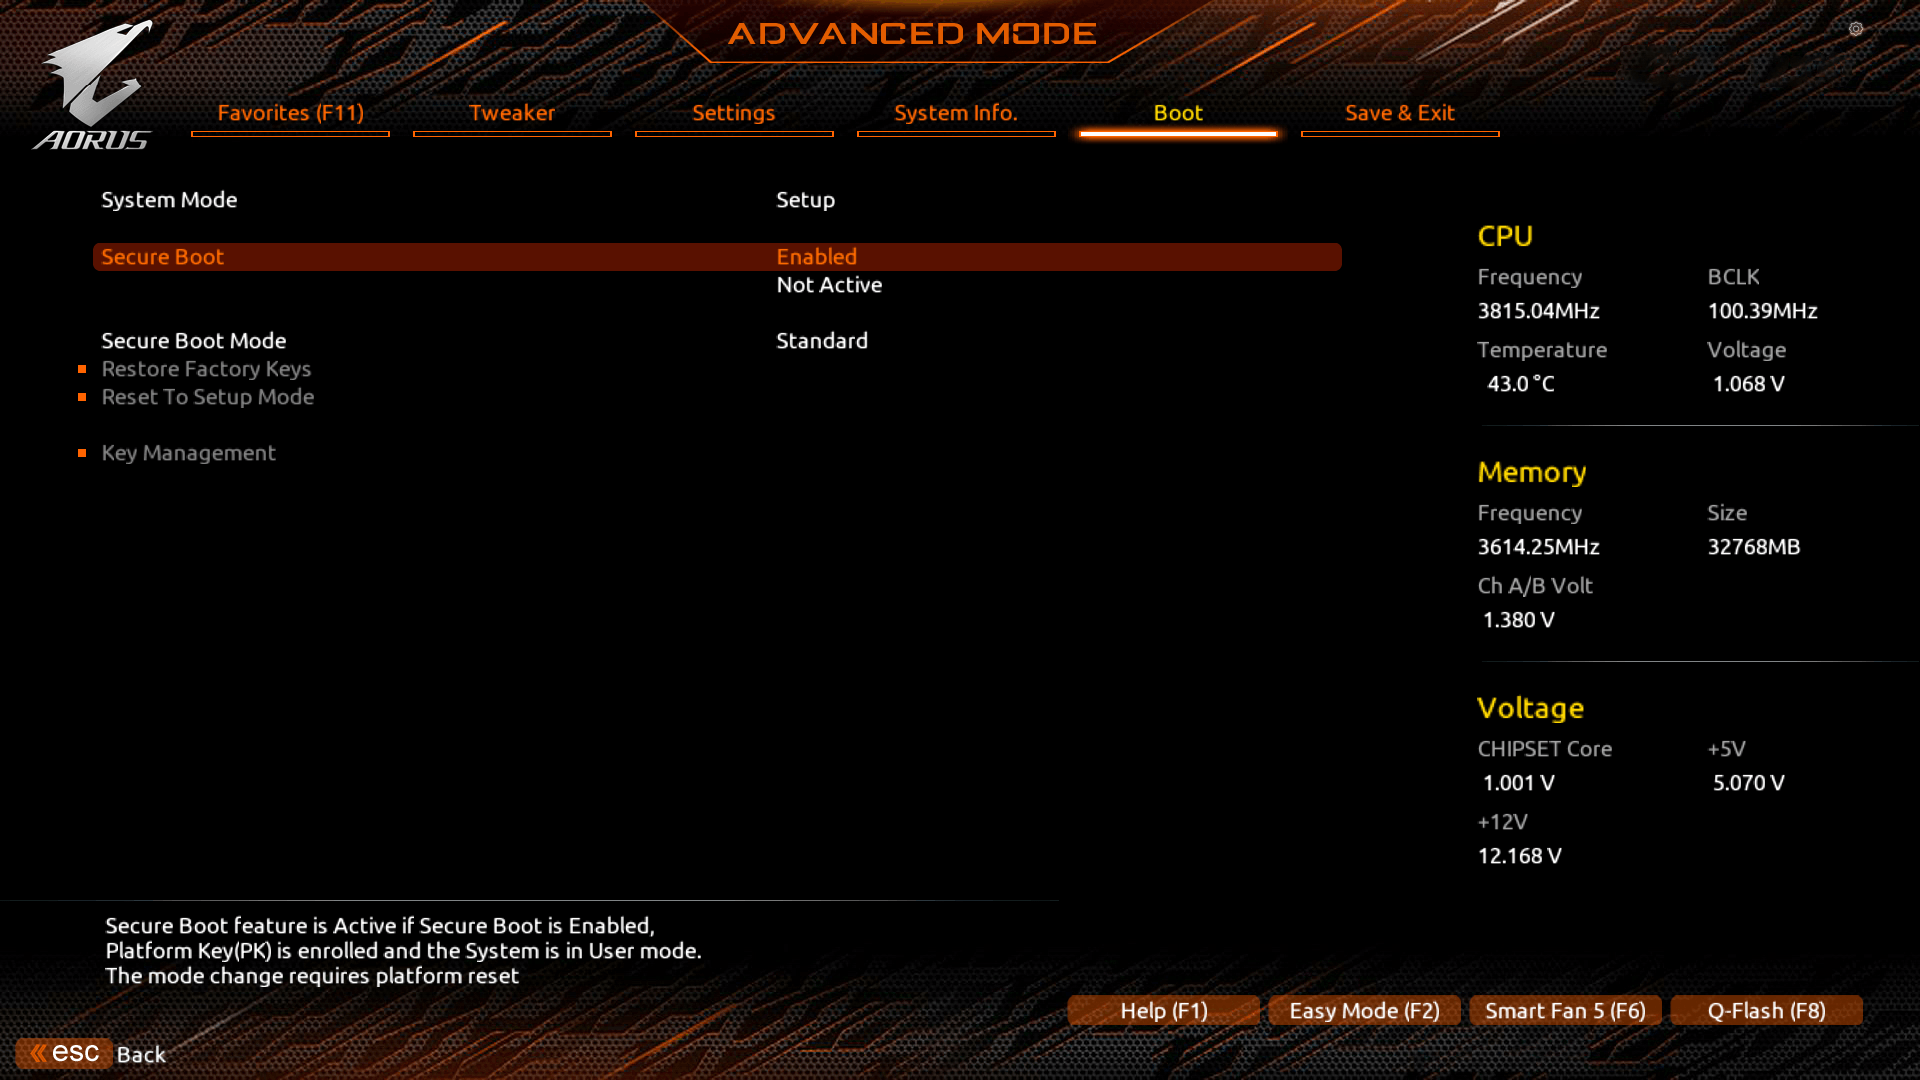
- Secure Boot (or Secure Boot State) should be set to Enabled. See Figure 8 below for example reference.
- Exit and Save changes (generally F10) and reboot.
- Confirm in Windows with Windows Key + R → msinfo32 if Secure Boot is enabled.
Figure 7
Windows Advanced options
Please note: When launching the game for the first time, you will receive a Windows User Account Control (UAC) prompt for an application named enrollaik.exe. Learn more about the UAC prompt.
Figure 8
Please note: The example below is for reference only, showing Secure Boot enabled on the Boot tab in Advanced mode.
Your BIOS settings and interface may vary depending on your hardware manufacturer. Consult your motherboard manufacturer’s manuals and support resources for more detailed information.
4. How to convert BIOS Boot Mode to UEFI from Legacy (or CSM)
- Access the BIOS/UEFI Firmware
- Using Advanced Restart or by pressing Del, F2, or F10 during boot (depending on your motherboard).
- If Windows boots up normally, restart and try again.
- Locate the Boot Mode Setting
- Once inside BIOS/UEFI:
- Go to the Boot tab or section (may also be under Advanced or Startup depending on your motherboard brand).
- Find the setting labeled Boot Mode, Boot Option, or UEFI/Legacy Boot.
- Once inside BIOS/UEFI:
- Change Boot Mode to UEFI
- If it says Legacy, Legacy Only, or CSM (Compatibility Support Module) → change it to:
- UEFI
- Or UEFI Only / UEFI First (depending on your options).
- If there is a CSM setting, disable it.
- If it says Legacy, Legacy Only, or CSM (Compatibility Support Module) → change it to:
- Enable Secure Boot (Required for Call of Duty: Black Ops 7 and Call of Duty: Warzone)
- Navigate to the Security or Boot tab.
- Locate Secure Boot and set to Enabled.
- If greyed out, make sure you:
- Have UEFI mode selected
- Save & reboot into BIOS again
- Save Changes and Exit
- Click Save & Exit tab or press save hotkey (generally F10).
- Choose Save Changes and Exit → Yes.
- Your system will reboot in UEFI mode.
- After booting back into Windows:
- Press Windows Key + R, type msinfo32, hit Enter.
- Look for:
- BIOS Boot Mode → should say UEFI
- Secure Boot → should say On
Important: Your BIOS settings and interface may vary depending on your hardware manufacturer. Changing UEFI/BIOS settings improperly can cause system issues. Always follow official instructions from your motherboard manufacturer carefully. Activision is not responsible for changes made to your UEFI/BIOS settings.
Helpful tip: The following steps will require you to restart your computer. Scan this QR code to continue reading on a secondary device.
Confirm After Reboot
UAC Prompts: CODBrokerInstaller.exe and enrollaik.exe
When you first launch Call of Duty: Black Ops 7 or Call of Duty: Warzone, you may receive a Windows User Account Control (UAC) prompt as part of the TPM 2.0 registration process. The default prompt is for an application named CODBrokerInstaller.exe.
To continue, you will need to enter your PC’s administrator username and password in the pop-up window and select Yes, which allows us to validate your TPM 2.0 settings. Selecting No or closing the pop-up window will result in not being able to play Call of Duty: Black Ops 7 or Call of Duty: Warzone. This prompt should only occur until you provide a username and password and select Yes.
In some cases, users may receive a different UAC prompt for an application named enrollaik.exe. To continue, you must select Yes, which allows us to validate your TPM 2.0 settings. Selecting No will result in not being able to play Call of Duty: Black Ops 7 or Call of Duty: Warzone. This prompt should only occur until you select Yes.
Please note: An issue with AMD firmware 3.*.0.*, where * represents any number, can result in a failure of registration through enrollaik.exe, surfacing the prompt multiple times even if a user selects Yes. If this occurs, it's an indication your PC motherboard BIOS requires an update. Check the Motherboard Guides section for assistance.
CODBrokerInstaller.exe authorization declined error
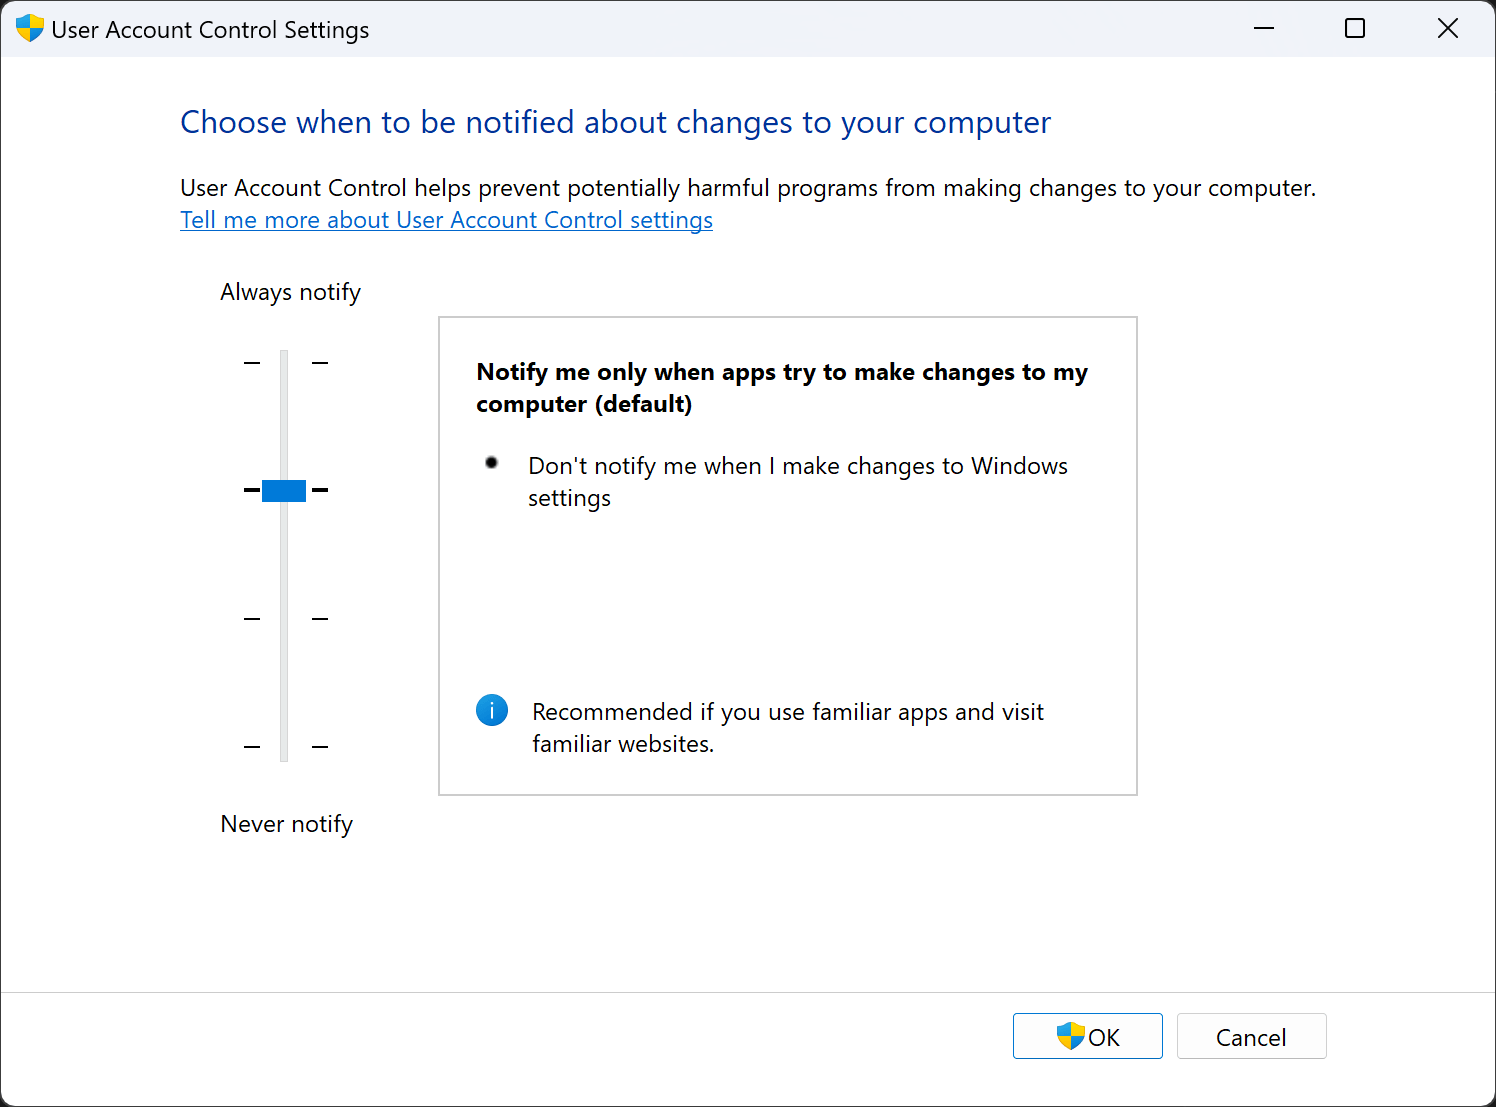
If you receive a CODBrokerInstaller.exe authorization declined error but do not receive a User Account Control (UAC) popup, you may need to change how you are notified when software needs to make changes to your PC. Follow these steps to change your UAC notification settings:
- Open Start on your PC.
- Enter “change user account control settings” and select the Control Panel option provided.
- In the User Account Control Settings pop-up, change the notification slider to Always notify at the top, or to the option below it (also the default option).
- Select OK.
Figure 9
Start menu search
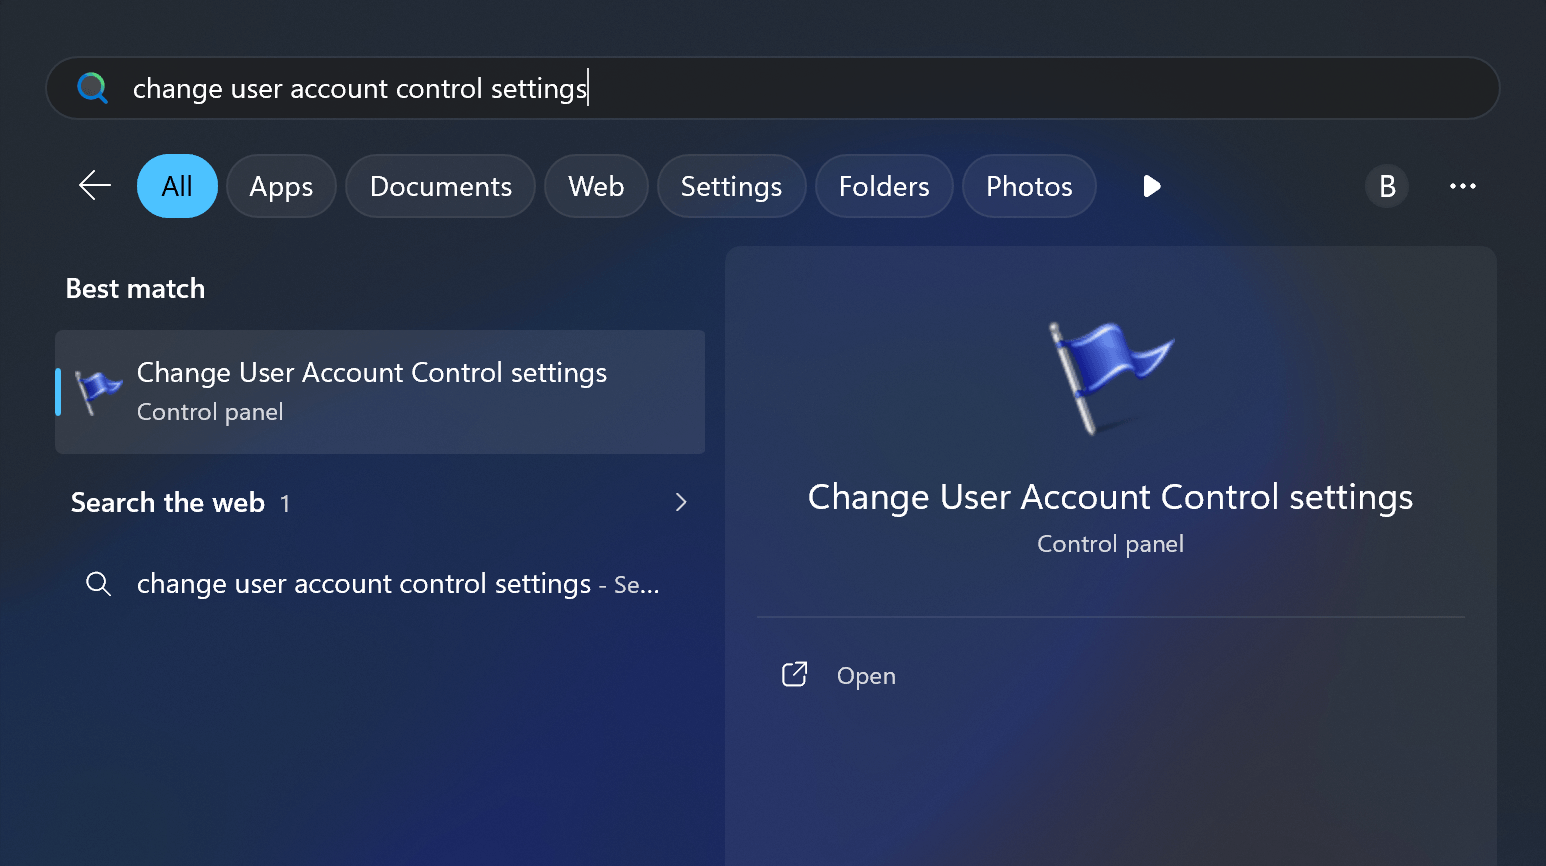
Figure 10
User Account Control Settings
If Windows doesn’t require a restart, please be sure to reboot the game to ensure this settings change is recognized.
Trusted Computing Group (TCG) Event Log Failure Notice
If your PC does not meet security requirements to play Call of Duty, you may receive a TCG Event Log Failed notification. To address TCG Event Log failures, you will need to restart your computer and apply the latest Windows update.
BIOS Firmware Update Guidance
If you enabled TPM 2.0 and are still getting prompted in Call of Duty, it's possible your motherboard requires a BIOS firmware update. Check your TPM Manufacturer Version to identify if a firmware update is required.
- Press Windows Key + R to open the Run dialog box.
- Type tpm.msc and hit Enter.
- Find your Manufacturer Version under TPM Manufacturer Information (See Figure 11 below).
Important! If your PC does not meet Call of Duty security requirements, a BIOS Firmware update may be recommended.
Please note that future updates may require full compliance. If requirements are not met, access to certain game modes (including Ranked Play) and playlists may be restricted and match quality may be reduced.
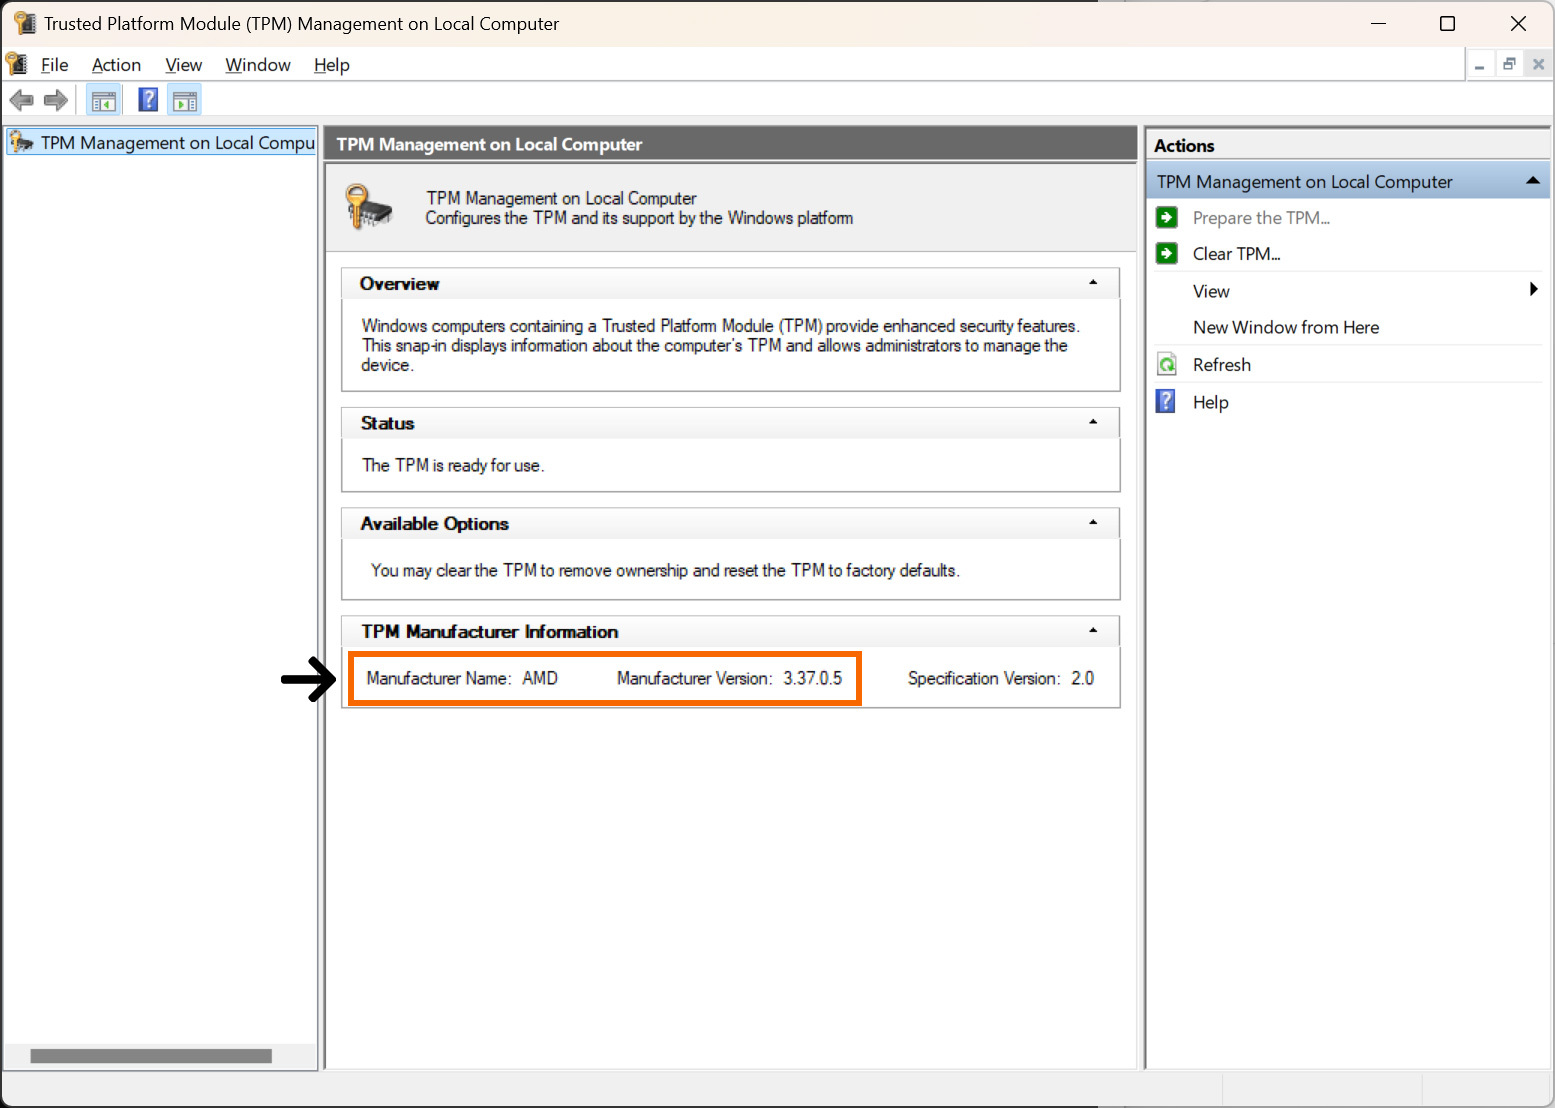
AMD Hardware Troubleshooting
If your Manufacturer Version is AMD 3.*.0.* (Figure 11), where * represents any number, your motherboard requires a firmware update.
For example:
AMD 3.92.0.5 |
Requires firmware update |
AMD 3.92.5.5 |
OK |
Please contact your motherboard manufacturer’s customer support to find out if a firmware update is available.
More details about this known issue can be found here:
https://www.amd.com/en/resources/support-articles/faqs/pa-420.html
Intel Hardware Troubleshooting
If your Manufacturer Version is INTC 302.12.*.* or INTC 303.12.*.*, where * represents any number, your motherboard may require a firmware update.
Please contact your motherboard manufacturer’s customer support to find out if a firmware update is available.
Motherboard Guides
To better assist players with activating TPM 2.0 and Secure Boot, below are links to official guides and tutorials from motherboard manufacturers. Links also direct players to official motherboard guides to assist with BIOS/Firmware updates that may be required as part of enabling TPM 2.0 and Secure Boot. If your specific motherboard manufacturer is not listed below, please visit their website directly for guidance and assistance.
Note: Some support materials reference upgrading to Windows 11 as part of its tutorial to TPM 2.0 and Secure Boot. PCs using Windows 11 likely already have both security features enabled, as they are required for the operating system. Windows 10 systems will require updates if TPM is disabled or if a legacy TPM version (1.0 - 1.2) is enabled. While TPM 2.0 requires Windows 10 version 20H2 or later, Call of Duty will require Windows 10 version 22H2 or later.
Be sure to consult your motherboard manufacturer's website for the latest information about firmware updates and release notes.
Acer
Acer General Support Hub | Acer Support Video Hub
- How to enable TPM 2.0: Acer Documentation
- How to enable Secure Boot: Acer Documentation
BIOS/Firmware
- Find and Download Latest Acer BIOS
- BIOS Update Video Tutorial: Updating Acer Systems
- BIOS Update Documentation: Updating Acer Systems
ASRock
- How to enable TPM 2.0: ASRock Documentation
- How to enable Secure Boot: ASRock Documentation
BIOS/Firmware
- Latest ASRock BIOS Releases Support Page
- BIOS Update Video Guide: Updating ASRock Motherboards
- BIOS Update Documentation (PDF): Updating ASRock Motherboards
ASUS
- How to enable TPM 2.0: ASUS Documentation | Video Guide
- How to enable Secure Boot: ASUS Documentation
BIOS/Firmware
- ASUS Search and Download Support Page
- BIOS Update Video Guide: Updating ASUS Systems
- BIOS Update Documentation: Updating ASUS Systems
BIOSTAR
- How to enable TPM 2.0: How to setup BIOS for Windows 11
- How to enable Secure Boot: How to activate Secure Boot in BIOS
BIOS/Firmware
- BIOS Downloads: Download Hub (search by model)
- BIOS Installation Guide: How to update BIOS (PDF)
Colorful
Colorful’s support is specific to each motherboard model. Search for your motherboard model using the support page linked below. Within each page is a download and support section specific to that model.
How to enable TPM 2.0 & Secure Boot: Support by model
BIOS/Firmware
- BIOS Downloads: Download Hub (search by model)
- BIOS Installation Guide: Support by model
Dell / Alienware
Dell & Alienware General Support Hub
- How to enable TPM 2.0: How to enable TPM 2.0 for Windows Security
- How to enable Secure Boot (Video): Tutorial Video
BIOS/Firmware
- How to enable Secure Boot (Video): Tutorial Video
- BIOS Installation Guide: Tutorial Documentation and Videos
GIGABYTE
Enable TPM 2.0 & Secure Boot on AM4 Motherboards: FAQ
BIOS/Firmware
- GIGABYTE Download Center (Search for your motherboard model)
- BIOS Reflash Guide: GIGABYTE Support “How to reflash motherboard BIOS"
HP
- How to enable TPM 2.0: How do I enable TPM on my computer? (Question 10)
- How to enable Secure Boot: Setup for Desktops and Notebooks
BIOS/Firmware
- HP Downloads Portal: Software and Drivers
- BIOS Installation Guide: Desktop | Notebook
Lenovo
- How to enable TPM 2.0: Video Guide
- How to enable Secure Boot: Search by product
- Additional resources: Search by product
BIOS/Firmware
If you’ve updated your BIOS firmware but you’re still failing attestation, please contact Lenovo directly so they can provide the correct BIOS firmware update for your PC.
To reach Lenovo’s contact options, select or search for your specific product model at Lenovo Support.
MSI
- Enable TPM 2.0 and Secure Boot on AM4 Motherboards: MSI FAQ
- How to enable TPM 2.0: MSI Motherboard Documentation
- How to enable Secure Boot (Video): MSI Motherboard Video Guide
BIOS/Firmware
- BIOS Update Search Instructions and Documentation: Updating MSI Motherboards
- Additional Information: Updating with M-FLASH
MSI TPM 2.0 Standalone Card